 Originally published January 2008.
The push press and jerk are essential functional exercises in the CrossFit toolbox. These movements can easily be adapted from traditional barbells to dumbbells, kettlebells, sandbags, etc. In this article, you will learn how to perform the double-kettlebell push press and jerk. To get there, we must first cover the proper method of cleaning two kettlebells and establishing a comfortable rack position.
Double-Kettlebell Clean
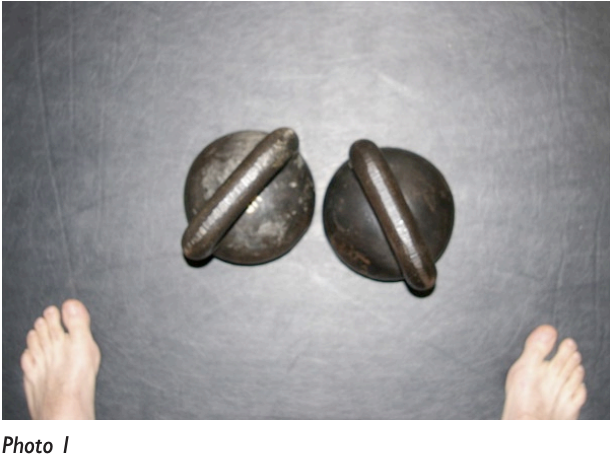
- Set two kettlebells on the ground in front of you, handles on the diagonal (photo 1).
- Take a slightly wider stance than you would to clean one kettlebell.
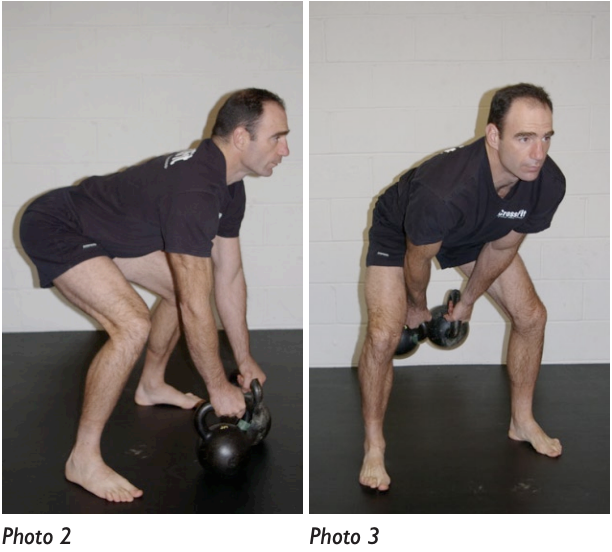
- Set your grip in the corners of the handles (photo 2).
- Keeping your head up and back straight, extend your legs and pull (i.e., hike) the kettlebells up in a backward arc between your legs (photo 3).
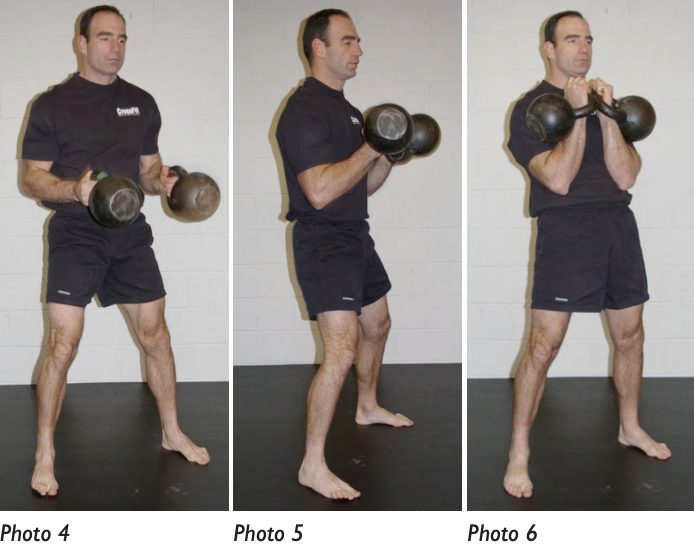
- Once the kettlebells reach the back end of the arc, explosively extend your knees and hips to drive the kettlebells forward and up, cleaning them to the rack position (photos 4, 5, and 6).
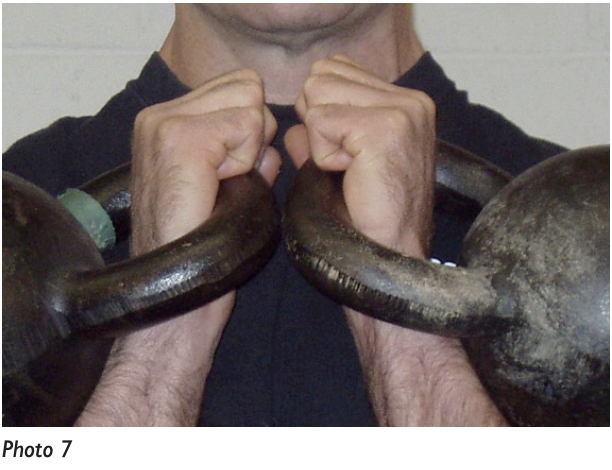
Caution: It is imperative that you unwrap and tuck your fingers as the kettlebells reach the rack position (photo 7). If you forget, it will be a “self-correcting,” since tucking your fingers will keep them from accidentally getting crushed between the two handles. Trust me, it will only happen once!
The Rack
Once the kettlebells are cleaned from the ground, a comfortable and solid rack position is essential for effectively performing a double overhead press, push press, or jerk. A good rack position has the following characteristics:
- Knees are straight but not overextended.
- Elbows are directly over the hips. It’s best to actually rest your elbows right on the bony part of the hip (photo 8). This will allow you to “relax” between reps, letting much of the weight of the kettlebells be supported by your body rather than your arms. If your body type doesn’t allow your elbows to rest on your hips, make sure the backs of your arms are glued to your torso.
- The web of your hand should be deep into the corner of the kettlebell. The handle itself should be diagonally across your hand, resting on the base of your palm. Your wrist should be straight or just slightly flexed.
- Open your grip and tuck all fingers except the forefinger. You don’t need a tight grip on the handle when it’s in the rack position. In fact, it’s best to give your grip a rest by relaxing your hands.
A solid and comfortable rack position is key to creating a positive transfer of force from the ground through your legs, hips, and trunk to your arms with no power leakage. If you allow space between your arms and torso, your efficiency, stamina, and power will decrease. There’s a saying in BJJ that “contact equals control and space equals escape” and in weightlifting that “when the arms bend, the power ends.” The same principle holds true here—for effective transmission of force, there should be no gaps between the links in the system.
Push Press
The learning sequence for overhead lifts moves from least to most dynamic and powerful: press, then push press, then jerk. The push press builds on the strict press (see CFJ issue 62) by tapping into the power of the hips and legs to help propel the weight overhead.
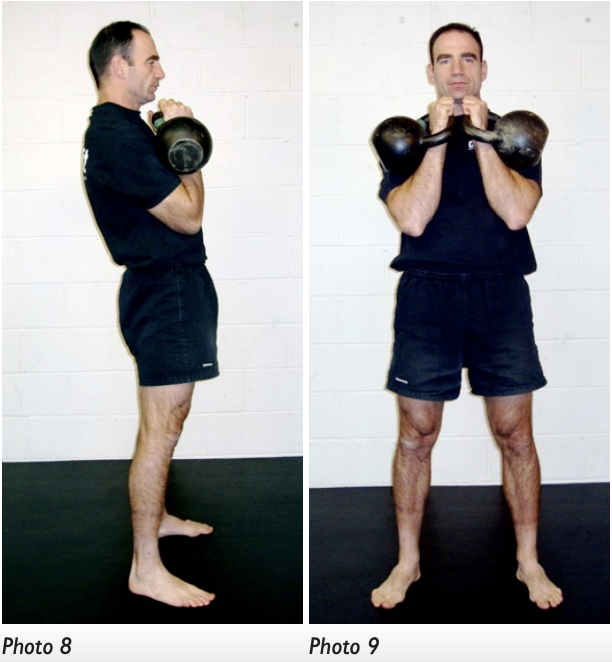
- Start by cleaning two kettlebells to the rack position (photo 9).
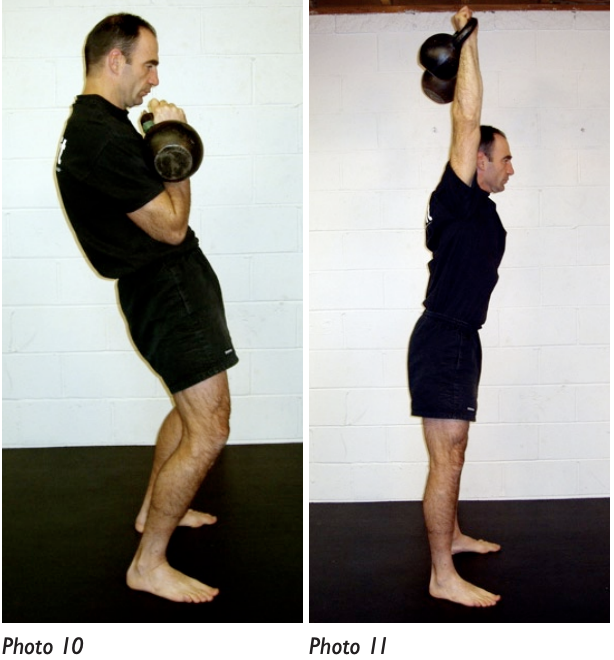
- Unlock your knees and hips to dip slightly, keeping your torso upright and the kettlebells firmly racked. Your knees will move slightly forward but not past the toes (photo 10).
- Powerfully push the floor away, extending your legs and hips, and open your chest. It is this explosive movement that will propel the kettlebells overhead. Note that the legs will then straighten powerfully, but there is no rebend, or “double dip,” in the push press when you drive the kettlebells overhead (photo 11).
- The arms move straight up from the rack. There is no need to rotate your palms forward as your arms extend. As the kettlebell passes eye level push your chest slightly forward. As your chest moves forward, keep your knees locked and do not bend them until it’s time to lower the kettlebell. Be sure your knees and elbows are straight at the termination of the lift.
- Lower the kettlebell back to the rack position. This should take a minimal amount of muscle or energy. Think of it as more of a controlled fall and catch. Unlock your elbows and slightly lean your upper body rearward. Tighten your abs just before your triceps touch your ribcage. As contact is made, absorb the impact by bending your knees and exhaling a little bit of air (photo 12). This helps facilitate a much softer landing, and it gets you into the right position to immediately perform another rep.
A great way to practice the push press is to perform as many strict overhead presses as possible. When you come to the point just before failure to complete the lift, switch to the push press and crank out as many reps as possible. This forces you to use the power from your legs. If you don’t, the weight will never make it overhead to lock out.
Practice for reps or for time. A fun and challenging drill is to perform as many push presses as you can in one minute. Another way to change it up is to push press one kettlebell for one minute, then switch hands and perform as many reps as possible for one minute; repeat.
A third way is to turn the push press into a thruster by adding a front squat before it. For an interesting changeup the next time you do “Fran,” try the thrusters with two kettlebells instead of a barbell.
Jerk
The jerk is a very efficient way to get a heavy object overhead—especially when the weight is too heavy or your muscles are too fatigued to press or push press it.
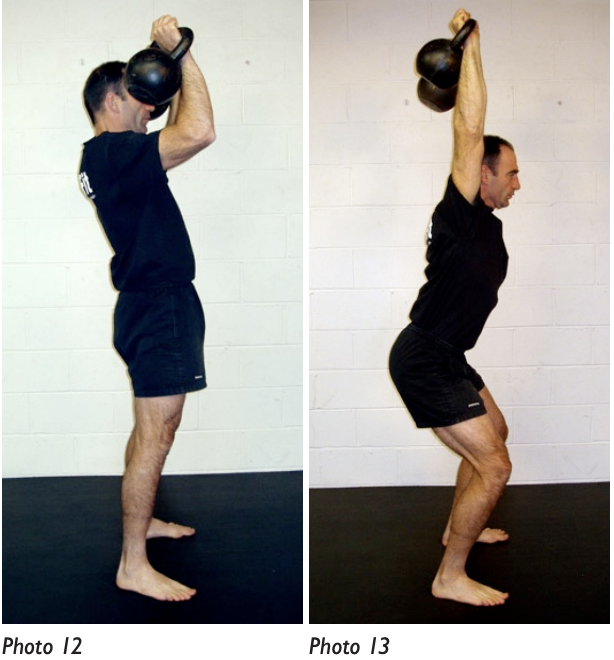
The first three steps of the jerk are exactly the same as in the push press. The difference is that, in the jerk, you drop under the weight as you drive it overhead, so that you land with flexed hips and knees in a high partial squat position before extending them to stand fully extended.
- Start by cleaning two kettlebells to the rack position (photo 9).
- Unlock your knees and hips to dip slightly, keeping your torso upright and the kettlebells firmly racked. Your knees will move slightly forward but not past the toes (photo 10).
- Powerfully push the floor away, extending your legs and hips, and open your chest. It is this explosive movement that will propel the kettlebells overhead (photo 11).
- “Drop and lock” by quickly sitting back (actively pulling your hips back and down and bending your knees) at the same time that you extend your arms overhead (i.e., lock your elbows straight) as you lean your upper body forward slightly (photo 13).
- Extend your knees and pause at the top position, with elbows and knees straight and torso tight (photo 11).
- Lower the kettlebells safely to the rack position (as in step 5 for the push press, above).
Practice jerks when your legs are fresh but your arms are tired from a high volume of presses. Make sure to extend the hips completely before making the second dip into the catch position. The hip drive is the power behind the movement; don’t cut it short. As with the push press, you can combine the jerk with a front squat make a demanding full-body strength and coordination challenge, especially when done for reps.
One of the biggest benefits of learning the movements of the push press and jerk with kettlebells is the ability to train around injuries. Many folks have chronic wrist or elbow injuries that can be aggravated by cleans and dynamic presses with a barbell. Remember, as Coach Glassman says, “the magic is in the movement,” not in the implement. The important thing is to keep training and keep safe. Whatever the implement, master the movements and don’t get hung up on the tools.
Click here to download the original PDF.
Learn more at the CrossFit Preferred Course: Kettlebell Rx 1.0.